2015-12-14

Brow and Lip Embroidery at BrowArt Studio

Advertorial

Nowadays it seems like every other girl have had eyebrow embroidery done! It is a beauty trend that is catching on like fire as women everywhere realise they don't have to wake up with bare brows that they have to spend 15 mins drawing perfectly...

Some days you can do a great job in 5 mins and you strut around like MY BROWS ON FLEEK YO.

Other days...


Oops

Brows are really important because they frame your face - I mean, there is an entire website dedicated to how horrific celebrities will look like without eyebrows. hahaha!!

Drawing the perfect pair of brows is difficult because not only do you have to figure on what suits your features and face shape, you have to pluck/shave your own brows to said shape, find the perfect eyebrow pencil (and cry when it gets discontinued), and after finishing one side, make sure the other doesn't look too different.

Not everyone has the skills or time for that.

But of course, a lot of people also fear... What if I get eyebrow embroidery and I hate it?? It is forever!!

Don't worry, firstly, it won't last forever as the ink does not go in as deep as traditional tattoos on skin. Most brow embroideries last 1-2 years.

Secondly, you will be able to choose your eyebrow shape before the embroidery process, it is not like someone just tattoos you while you are unconscious!

Personally, for me, many salons have approached me for eyebrow embroidery sponsorship before, but I never went for it.

The reason is that I'm always either with blonde, pink or purple hair, and my brow colour changes which each hair colour. When I'm blonde, I use an ash blonde pencil and I bleach my brows. When I have pink hair, I use dark brown. When I have lilac, I use an ash grey pencil.

But I've finally decided to take the plunge and just do a default light brown colour! I reckoned that if I'm blonde I can just lighten it with foundation and brown suits purple and pink fine.


And so off I went to BROWART STUDIO!!


First, I met with BrowArt's embroidery artist Jenny, who did hundreds of eyebrows before with 10 years of experience.

We did a consultation for me. The raging trend for brows now are Korean brows which are full and straight, so she drew that on for me to try. I didn't like it because it simply doesn't suit my face.

And so I opted for something that is close to my natural shape. The end tips of both my natural brows are sparse, so she filled those areas up.

Sorry cannot find any photos of my bare brows wtf... I forgot to take a photo before Jenny drew on me and I can't find any in my photo library because I usually will draw my brows and I don't usually take photos of myself without makeup. O_O So yeah no before pictures sorry!!


After my brow shape is decided, numbing cream is applied!


I wait for it to take effect for a while, then Jenny starts...


She uses a thin, fine blade to imbue the ink. BrowArt's ink is imported from Korean and my colour was specially mixed for me!

Don't worry, they use really good numbing cream and it was not painful! At certain areas I felt a bit of discomfort like if someone is scratching me. If you feel pain, just ask Jenny for more numbing cream.

Nowadays people all go for 3D brow embroidery, which involves using a thin, fine blade and not the traditional vibrating tattoo needle.

The effect is drastically different:


When you observe very very closely, you can see which are the tattooed "hair" and which are my real brow hair.

Her strokes are more obvious in pictures, but I f someone is just looking your face, they almost can't tell and it's super natural!

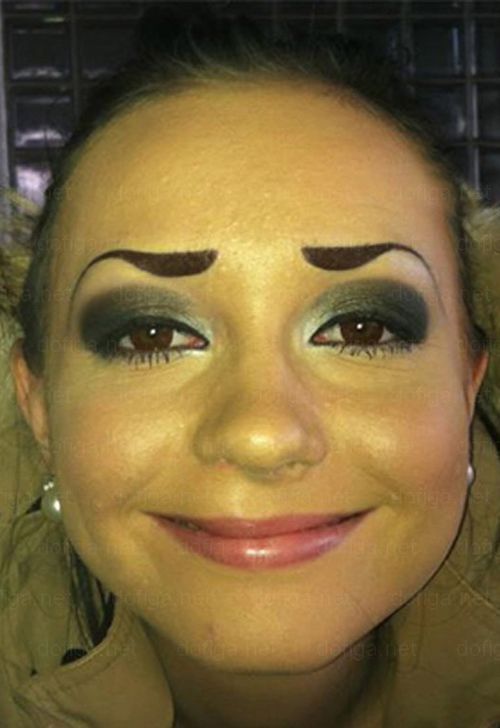
The horrible ONE PIECE greenish tattoos that aunties in the past used to do that defined eyebrow embroideries are a thing of the past!!

Nowadays eyebrow embroideries don't look like that anymore and neither does BrowArt's ink fade to a horrible green.


End result!! Love it!!

After the embroidery, it is natural for the brows to look a little harsh. The ink will scab over and fall off, leaving a lighter colour.

For a few days I walked around with more severe looking brows, but nothing bad. The skin around the brows will also be dry, but BrowArt will give you a cream for that.


Here's an after picture!

I also did Lip Embroidery with BrowArt!

Personally, I've always hated my natural lip colour because it has this brown tone which I feel clashes horribly with my light hair. So I ALWAYS have lipstick on.

Some years back I did lip embroidery at some shady salon and it was so horrifically painful. After that the lips looked a bit orangey brown to add insult to injury. #%^@!$* Lao niang paid money for it some more!!! ANGRY!!

So I thought... Nothing can be worse than the colour I had, so why not give it another try? Jenny said it is painless.

I did my lip embroidery with them twice, the second time being the touch up:


After the first embroidery, my lips looked more pink and less brown. The above is the picture!

Just like the brows, numbing cream is first applied on the lips, and a gauze is inserted into your mouth.

During your consultation you can tell Jenny your lip concerns, and she will choose and mix a custom ink colour for you.

And so she started...

It is really zero pain at all wtf!!! I don't understand how the previous time can be so painful and this time no pain at all?? I almost fell asleep!


The ink colour is this fluorescent neon pink but don't worry, it won't turn out like the ink! Will be much lighter.

The recovery for the lips is however not as smooth as the brows. My lips got really swollen for the next 2 days, and extremely dry after that for 2 weeks. I have to keep applying the gel that BrowArt gave me.

I also have to give fair warning to anyone planning to do lip embroidery that the results are not super drastic. Do not expect to achieve Diva Von Teese's red lips because due to the natural colour of your lip's skin, it can never be that intense.

For me, personally, I just wanted to change my orangey-brown hue to a more pink colour. The change is subtle but good enough for me.


I literally took this photo with no makeup as I am writing this entry so you can see after a few months this is the end result!


Here is BrowArt Studio's details:

Address: 112 Katong, East Coast Road #01-17 

Opening hours: 12pm to 8pm everyday 

Contact No.: 6702 0768/98244400 

Email: enquiries@browartstudio.com.sg


Their Instagram page has more before and after photos!!


HERE IS THEIR WEBSITE!!

Read The Full Article
2015-11-23

My double eyelid surgery with Beverly Wilshire

Advertorial

If you follow me on snapchat (id: Thexiaxue) you would know that about a month ago I did my double eyelid surgery! Here is the blog post about my latest plastic surgery journey!

As I mentioned on my Dollywink post, I have double eyelids but they are tapered and low. So I always put on eyelid tape whenever I have makeup on.


You can see the difference with tape and without.

I've actually gone through eyelid surgery before in 2010 - you can see the post here. In 2010, I did the sewing of eyelids** and the cutting of the outer corner of my eyes.

That surgery was terrible. Like so so so so bad. The surgeon was a China guy who can't even speak English. It was extremely painful. I had a shot of LA under my eyes that felt like it pierced into my eyeballs and what's worse is that I knew I had to go through it again for my other fucking eye. Pain scale 9/10.

After the surgery, I realised that both my eyeballs suffered trauma and both my eye whites became a very scary red colour, from multiple burst blood vessels in the eyes.

The redness which made me look like Lord Voldemort incarnate lasted for MONTHS. When confronted, the centre told me it is normal, but it is only now that I've been told it means the surgeon was very rough with my eyes and this is not normal at all.

Then it came to the removal of stitches. I cannot begin to say how fucking painful it was. It was truly the most painful I've ever felt in my life, even worse than the LA jab into my eyeballs.

It was an inexperienced nurse removing the stitches for me, and she kept tugging at the threads around my sore and tender wounds. She tugged and tugged and still the stitches didn't come out, so the ordeal lasted over half an hour. It was half an hour of pure torture and I cried and cried and begged her to stop but she just kept saying it's about to be done. I was actually yelling and when it was finished I couldn't stop crying. And since I have a super high threshold of pain, when I say this is 10/10 painful it means it really is.

All these would have perhaps been worth it if my surgery made my eyes any nicer, BUT IT DIDN'T.

There was NO DIFFERENCE. I know in the blog post I linked I said it looks better but after the swelling went down, the eyelids become low and tapered again (as evident in the photo above) and I didn't feel the outer corner incisions made any difference.

 So I just used eyelid tape afterwards and didn't bother anymore.

Then Beverly Wilshire approached me interested in a collaboration, so I gave them a visit.

Their centre is located in Johor Bahru, a 10 min drive from the causeway so it is very convenient for Singaporeans to go to.

What is Beverly Wilshire?

Beverly Wilshire Medical Centre (BWMC) is a multi-award-winning integrated beauty medical centre that sets the standards in cosmetic surgery, aesthetic medicine (non-surgical and laser treatments), and healthy ageing (wellness and regenerative therapy) in the Asia Pacific region. The centre offers a comprehensive range of established cosmetic procedures, aesthetic treatments and health services, allowing the provision of a holistic approach to its three core specialities.

BWMC is backed by registered and board-certified plastic surgeons. All cosmetic and aesthetic procedures are performed by highly experienced and qualified doctors in world-class operating theatres using the latest FDA approved medical equipment.

 In short, Beverly Wilshire is a plastic surgery centre, but they are more than just that.

Being situated in Johor Bahru, Singaporeans might feel a little apprehensive but all my doubts disappeared when I saw their centre.


The centre is HUGE and occupied most of the second level of the building.


Everything inside is very posh, newly renovated and clean.


The centre actually has its own wards for patients to rest after surgery. They are fully equipped and very comfortable, with many nurses around.

The surgery room is also within the centre and they have their own professional anaesthetist.


Singaporeans may not have heard of Beverly Wilshire but they are an established name in Plastic Surgery in Kuala Lumpur.


BWMC won many awards before, including a very prestigious "International Cosmetic Surgery Clinic of the Year" - competing against clinics AROUND THE WORLD.


Cheesie actually went to their centre for a review back in 2013. Many celebrities actually go to them for treatments!!


Their JB branch, which I went to, is newly opened.


Here's Yutaki and me at the centre.


Yutaki and I consulted with Dr Lawren Lee, who does aesthetic procedures such as botox or fillers.


Next I consulted with Dr David Cheah, whose full name is really very full: Professor Dato Dr David Cheah Sin Hing. He sure damn sian when he got to fill up forms with his name.

Seriously he has so many prefixes to his name that I don't know which one to call him to be the most respectful... is it Professor or Dato or Doctor? (Answer seems to be Professor)

Anyway, obviously Professor Cheah is super experienced and he was so very patient when I was consulting with him.

At this point I actually didn't want to do any invasive surgery (Mike sure don't allow) but Yutaki kept convincing me to do my eyes.

I went home and talked to Mike about it and also my mom... Surprisingly enough my mom said yea the eyelid tapes are actually quite obvious so she thinks I can go ahead and do this one.

Sometimes, after I remove my eyelid tape one eye still has the thick eyelids and the other the low tapered version. It looks so uneven and ugly lah... This can last for days so I look damn weird without makeup.

Mike didn't want me to do the surgery but I explained to him about the uneven-ness and since it is a pretty simple surgery he allowed me to go ahead with it.

And so I decided on cutting double eyelids and also epicanthoplasty, which is the cutting of the inner corners of the eyes!

Just now I mentioned that I did sewing of double eyelids before in 2010. For those of you who don't know, there are two types of double eyelid surgery - Sewing and Cutting.

Sewing is the less invasive of the two. It involves simply weaving a thread through your eyelids. It is reversible, but might not be permanent.

The cutting method involves actually cutting out a wedge of skin/fats in your eyelids. It is permanent but takes a longer time to recover.

Since the sewing method did balls for me, I decided this time to do the cutting method. Prof Cheah also suggested epicanthoplasty because he said the inner corners of my eyes needed to be cut to achieve parallel eyelids.

************************

The day of the surgery came. Sorry no pics because I was put in scrubs and wheeled into surgery room pretty much immediately.

I ate lunch normally (phew wasn't asked to fast), had a last consult with Prof Cheah about what I wanted for my eyes, and he begin to mark the spots on where he was going to cut etc...

I was told I was to go under "twilight surgery", which I have never done before. All of my other surgeries were done under Local Anesthesia so I was fully awake for them.

I was asked to ingest a pill that will make me sleepy. After that, they gave me an injection on my arm that wasn't painful. This was supposed to be the sedative.

OMFG I LOVE THIS SEDATIVE SO MUCH.

Like immediately a feeling of relaxation, happiness and peace spread into my body. The last thing I said to Professor Cheah was "This is wonderful, I can no longer feel my body aches." and he laughed.

Subsequently I suppose he started on the surgery. I felt absolutely no pain. My body felt too heavy to move but my mind was still wide awake. I was in a warm state of bliss and I found that being on the sedative was like lucid dreaming. I could control my thoughts to be happy like imagining unicorns and even thinking about Dash being cute and it was so nice. I know this post is supposed to be about the eyes and I know you want to see the end results but omg seriously the surgery process was just so enjoyable.

I now know why people get addicted to drugs lol... Externally I could hear everything that went on in the surgery room, including Professor Cheah listening to English oldies while operating (which I enjoyed as well lol). I remember thinking that I hope the surgery lasts longer because I was having so much fun. Hahaha

Anyway this was a far cry from my previous traumatic surgery wtf.

It was only after the surgery that they put me in the ward and I actually fell asleep. I woke up and could see clearly with no impaired vision but I felt a bit groggy.

Prof Cheah told me the surgery went great and he is very pleased with the results. He also said it was a difficult surgery to do because the China doctor's old threads were still in my eyes and he had to remove them.


Then he showed me the stuff he took out from my eyes: The old threads and bits of fats/skin from my eyelids. I politely declined taking these home.


I felt absolutely zero pain around my eyes. They were the tiniest bit sore but it was nothing.

Immediately after surgery

The eyelids looked very swollen and I still have stitches in. If you do the same surgery, be prepared to be ugly as fuck for at least 4 days? But ok lah can hide behind sunglasses.

I went home, ate some food, played with dash for a bit hiding behind glasses, and slept more.


This is day 3. The little tapes can be taken off after 2 days and Prof Cheah said I can actually put makeup!!


I think this is day 5 or 6 post op with no eye makeup, and the stitches are still there.

I went out for an Urban Decay event and put thick makeup lol...


Here I am squinting in the sunlight as I take a selfie while walking along orchard road. Even though I still had stitches on most people said I didn't really look freaky anymore.


7 days after the surgery, I went back to Beverly to remove the stitches.

Due to my previous horrific Saw-worthy experience with stitch removal, I was scared like crazy but it was Prof Cheah himself who removed my stitches, not some inexperienced nurse. It wasn't painful at all!!


This was taken 1 day after stitch removal. The left is me without eye makeup and the right is only with mascara + a bit of eyeliner drawn at the wings!!


This is so super crazy!! In the past, my eyelashes always point obstinately downwards. Even if I curl them like crazy, I can never achieve this wide-eyed effect, which is why I usually don't bother with mascara and just go with falsies.

Now however, due to the skin being cut and sewn higher, the eyelashes point upwards and look so long when mascara-ed!!

You can still see that the eyelids are a bit swollen still, and Prof Cheah said they will go down even more. The inner corner takes a long time to heal and till now, 1 month after the surgery, they are still a little bit lumpy. But this is normal and it can barely be noticed unless someone looks really closely.

Photos 1 month post op with makeup:


How I wish I have your natural big eyes baby!!


None of the eyes in this post's photos are edited btw.

Very pleased with my eyes now! Thank you Beverly Wilshire and Dr Cheah for making my plastic surgery experience so pleasant.

Other than double eyelid surgery, Beverly Wilshire also does many other procedures such as nose jobs, boob jobs, liposuction, etc. Hair grafting is one of their specialties.

My surgery costs RM5500 which is SGD$1822 approximately.

The centre provides transport for Singaporean patients so you will be picked from home and sent back to your doorstep.

If you are interested, this is their website:


You can also make an enquiry by emailing them at: enquiries.jb@beverlywilshiremedical.com

Disclaimer: Naturally plastic surgery or any form of surgery poses risks. Please do your own research before proceeding. If you choose to undergo the same surgery as me, understand that since nobody's eyes are exactly the same, the results might differ.

Read The Full Article
2015-09-24

3M Hot, Cold and Room Temperature Filtered Water Dispenser Review

Advertorial

Our human body is 60% made up of water.

We should drink 8 big glasses of water everyday to replenish our fluids, and drinking enough water makes us healthier, more beautiful, and even less likely to fall sick!


So it is pretty obvious that water is important to us... But water is just water, isn't it? Unlike teas or sweetened drinks, there aren't much choices when it comes to water. The water we drink at home is just... plain water.


I'll be honest. I know most people don't do this, but all my life I've drank my water directly from the tap! I know it's safe-ish because I never fell ill from drinking tap water, but I never did any research on whether it's good to do that or not.

When I was told 3M was giving me a water dispenser, I wasn't very impressed. I thought it was just a filter I had to attach to my tap or some troublesome jug I had to keep refilling.

The day of installation came:


I led the installation guy into my kitchen...


Here he is, taking apart my drawers. I was actually quite surprised because well... it isn't just a filter on my tap, or a jug! The drawers had to be taken apart because a tube had to run directly from my water supply to my 3M Table Top Dispenser.

The tube was running under the cabinets so it won't be ugly and visible.

It looks very messy because my kitchen top has so many items... Of all the things there the one I hate the most is the stupid kettle which you can see is silver and black.

I had refused to buy a kettle. I don't like drinking hot drinks so I don't often use hot water. But if I needed to, I either put water into a pot to boil or put a mug into the microwave. The principle of buying an external appliance for making hot water just offended me because seems so medieval that there shouldn't be an extra apparatus occupying my kitchen top space for it. Nor should I be spending any money buying a KETTLE!

However, having a kid meant making milk and hot water is needed. Frustrated with my obstinate refusal to invest in a kettle, my mom brought one from her house, and it is semi broken with scorchtape on the wire. A bit hazardous. And it's so ugly and takes up so much space and it's so scary like anytime can scald people who touch it accidentally.

ANYWAY I WANTED TO SAY MY KETTLE STORY BECAUSE I CAN NOW FINALLY GET RID OF IT!!!!!!!

I AM SO HAPPY!


My 3M Hot, Cold and Room Temperature Filtered Water Dispenser is neatly installed!!

Although this is an advertorial, I just want to say, 100% truthfully, that it is probably one of the most used items in my house, by everyone in the family... and we all LOVE IT TO BITS!!!!


True, this is not the sexiest sponsored item I've received. But it is indeed very very useful and practical. It has truly won me and the family over.


Here's why:

1) Clean, filtered water

Remember just now when I said water is just plain water... Well, that's not correct. There are many different grades of water.

I have said just now that I always drink water directly from the tap. I may have no qualms about risking my health, but I most certainly refuse to subject my toddler to the same.

That meant that if I needed to fill up Dash's water bottle for the day, I had to first boil water then put the water somewhere for it to cool. It wastes both time and space.

Now, I can let him have safe and clean water directly from the 3M Table Top Dispenser because it dispenses room temperature water! I can make his milk and fill his cup during meal times with water I know is safe for him!

Using 3M miniaturization technology in the 3M AP2-G filter,

- chlorine taste and odour,
- lead and volatile organic compounds which are believed to lead to health risks
- sediments as fine as 0.5 mircons
- 99.95% of Protozoan cysts (not quite sure what this is but it sounds bad)

all of the above are gone from the tap water I would otherwise be drinking.

The 3M Table Top Dispenser is the ONLY dispenser in the market that is BPA free! 

Most parents won't let their babies drink out of milk bottles that aren't BPA-free, so if you are intending to buy a dispenser for child-use, take note of this!

Additionally, the 3M Table Top Dispenser comes with an ultra violet light system that sterilises the filtered water by 99.99%, removing pathogenic bacteria.

It is also very easy to change the filter, there is no need to service the machine.

You may be surprised to learn this because 3M is known for stationary... But they do have 75 years of filtration experience!!!


2) Cold water, immediately whenever I want it


The 3M Table Top Dispenser dispensing cold water. It is immediate and very cold!!

The husband and I are both fans of ice cold water. Before the 3M Table Top Dispensercame into my life, Mike used to get his cold water from a filtered jug.

He doesn't like drinking tap water straight from the tap, so he fills up this big jug with a filter on it, then he puts it in the fridge.

I USED TO HATE THAT JUG.

It takes up so much valuable fridge space. It is also too heavy for me to carry properly, so when I try to pour water out of it I always spill. It also makes Mike mad if he finds his jug empty, which meant that out of courtesy I should refill the stupid jug if I drink out of it. Seriously, it's way too heavy and cumbersome for me to do that, so I rather just leave him to his jug. If I'm not utilizing it, all the more it makes me irritated that it is taking up my fridge space.

As a result, I often resort to using ice cubes (also troublesome to refill), or just drinking room temperature water which I don't like as much. This also made me drink less water because when it's not cold it's not as tasty.

BUT CONFETTI BECAUSE NOW MY COLD WATER PROBLEMS ARE SOLVED!!

Now, whenever I want, I can fill my cup with crisp, cold, clean filtered water, and drink to my heart's content.

We have thrown away that irritating jug. The husband cannot stop praising the 3M Table Top Dispenser, and every guest that comes to my house loves it. Some have even remarked that the cold water is just the right amount of cold and wanted to get their own.

I use the cold function every single day.

See the blue button there with the water droplet? Simply press it and out comes filtered room temperature water instead if cold is not your thing.


3) Hot water


Want to make a cup of coffee?


First press this button, and wait just 1 or 2 mins for the water to boil.


And voila! You have boiling hot water! To be extra safe, you have to first press the hot button then press the black rectangle that's behind the cup for hot water to come out. This is to prevent children from any mishaps.

The hot water function is also very useful for my family as Mike, my mom and my helper all drink coffee. A bit of hot water is needed for Dash's milk as well.

I really really wish I had the 3M Table Top Dispenser earlier! All those times I had to warm water in the microwave to make a water bath to warm up breast milk... This would have made my life so much easier!

Oh and I finally threw away the hazardous kettle. YAY!!!


************************


In short, I would like to give the 3M Hot, Cold and Room Temperature Filtered Water Dispenser 5 stars out of 5.

It is easily one of the most useful appliance I have at home, and everybody in the family LOVES it.

In Singapore's hot weather, I always feel so grateful whenever I get home from bringing Dash out to the sweltering park and I can immediately get myself a glass of ice cold water... FUSS FREE.


Everyone who comes to my house always tells me they want the 3M Table Top Dispenser, and asks me how much it cost.

The usual price is $1,888.


But now there is a special promotional price of $1,388!

Additionally, you get 3 FREE filter replacement cartridges worth $155 each!

AND you can get and extra $50 off, specially for my readers only!!


All you have to do is register now HERE and use blogger code “XIAXUEHCD2”.  It only takes 30 seconds!


Friendly consultants from Jestac, the 3M Authorized Distributor will contact you to inform how you can collect the $50 voucher.

If you want to see the actual 3M Table Top Dispenser or try a cup of 3M Filtered Water, you can visit 3M’s Authorized Distributor at:

JESTAC PTE LTD
No.2 Kim Chuan Drive CSI Distribution Centre #02-06 Singapore 547080
Mon - Fri 8.30am – 5.30pm, Sat 8.30am to 2.30pm
Tel: 6288 8290
Email: sales@jestac.com.sg

The 3M Table Top Dispenser is also available at most Selffix stores.

Remember to like Jestac's facebook page to get the best promotions!

Read The Full Article
2015-09-22

UOB One account for the best interest rates!


Advertorial

I admit that when it comes to matters of finance, I am a complete idiot.

It is a very dry subject to me and I always just doze off when I hear people rambling about banks, interest rates or loans. My mother on the other hand is pretty good with these things (she used to be a bank teller in the 1980s) and she would always handle all my finances for me.

Till today, I am still using the same bank account that I had since I was a child. 

The bank when my mom opened for me to put my angpow money inside... I am still using that at age 31!!


One of my old Nuffnang cheques... Just anyhow deposit into my childhood bank account


The bank gave me an atm card so I used it. One day it broke and I went to the bank to replace it, then they said "here, we will give you a debit card instead". I said "Oh ok" and I've been using that same card till now. 

The card works, the account works, so I just never bothered to change it.

Birthed a pretty cute dependent


I used to be so cavalier about my money because I only needed to care about myself. Now, I have a dependent. It sounds so disgustingly uncool to say this, but I really need to plan my finances better. And maybe it doesn't seem sexy to do so, but there is nothing sexy about being broke when you are old either!


Back to my bank choice... It is only when I was preparing for this blog entry that I realised I have been missing out on a lot of extra money I could have had... all these years!

Why?

I know finance is a very boring topic so I'll try to keep it a bit less technical. Everybody knows what interest rates are, right?

I found out that the interest rates for my account is only (I need client to let me know how much my POSB Savings account interest rate is)

To put it very simply, if I have $50,000 in my current bank account for a year, I earn an interest of $xxx.


Erm, that's like one of the lowest interest rates in Singapore. Or perhaps actually the lowest.

After I found out about the newly launched UOB One Account, I did some research on it and found this very comprehensive article which breaks down all the financial jargon into bite sized pieces! http://blog.moneysmart.sg/saving/why-the-uob-one-account-easiest-earn-interest-singapore/

With the newly launched UOB One Account, I would have gotten an interest of $1216 on savings of $50,000!!


Yes, the UOB One Account actually offers the highest interest rates in Singapore for fixed deposit accounts - a whooping 3.33%.

Of course, before you think you can simply set up your bank account with UOB and get 3.33% interest, there are some criteria to consider before you can get the best interest rate out of your bank.

At first glance I thought these criteria are very difficult to fulfil since I am not technically employed, but they are actually quite easy.

Here are the criteria:


First, you have to spend at least $500 on your One Account, every month. 

That's really quite easy.. It takes me only 3 grocery trips to spend $500. :( #milkpowdersoexpensive

Who doesn't spend at least $500 a month right? If you don't please teach me how wtf.

Then, you have to fulfill either one of these criteria:

- Credit your monthly salary of at least $2,000 every month into the account,

- Or use the One Account to pay for at least 3 bills every month with GIRO.


Now the monthly salary thing won't work for me because I tend to only request my cheques from Nuffnang when I run out of money (told you my finance handling is very medieval), but the GIRO thing I can do!

GIRO my phone bill, my insurance payment and my helper's levy. Done!

For many working Singaporeans, a $2,000 salary isn't very hard to achieve. If you don't have that, 3 bill payments are still pretty easy to do.

(Of course, the bank uses some complicated method to calculate your interest rates, so it doesn't mean that if you have $10,000 in your account you will automatically get $333 for free. To understand more about how the calculations work, you can refer to this blog or go to UOB One Account's website!)


Paired with the UOB One Account is the UOB One credit card!


Dubbed "Singapore's Most Generous Rebate Card", it promises you:


Up to 5% rebate on all spend, up to 3.33% rebate on spend below $2,000


Car owners will LOVE this: Up to 22.9% at Caltex and 24% at SPC!! 


ME ME ME I NEED!!


And the card is so cute!!! Check it out:


This is how it will look like if your name is Jaime Wang.


It is a special limited edition SG50 card!! Got five stars!! #simisaialsosg50 #butthisoneiscutelah

To find out more about the privileges and amazing rebates of the UOB One Card, you can click here!

You can get the UOB One account and the UOB One card independently of one another but to get the best interest rates and rebates, it is good to use them both together.


Interested? (lol coz this post is about interest rates ok so that's punny)

It only takes 10 mins to open an UOB One account and to apply for your cute Limited Edition SG50 UOB One card!


I told my mom about the UOB One account and asked her if she thinks I should apply. She immediately said yes!

To put my money where my mouth is (not literally because the UOB One account isn't in my mouth har har har), I have just applied for my UOB One account and UOB One card!!

Yes! I personally believed in it so much that I applied for the 1st bank account I ever opened in my life. (1st one is opened by my mother) LOL I guess my blog post is so convincing it convinced me too. Hahaha!


And yes it only took me 10 mins, super easy wtf!!

I'm looking forward to not being a sucker for shitty interest rates anymore and for a much nicer looking card to use! And all the rebates I have been missing out on!


Read The Full Article
2015-08-16

Dolly Wink Big Eye Make

Advertorial

So this is how my typical daily makeup looks like:


Chio right hahahahaha


OK, here's the startling difference with only one side of eye makeup done:

.
.
.
.
.
.


TADAH!

I didn't photoshop the eye makeup at all!

Want to know how to do big eye makeup? The Japanese look to dramatically enlarge their eyes and sometimes they use pretty extreme makeup that some people might find too... exaggerated for daily wear. It's a bit weird to go work/school with getai makeup! The key should be to enlarge your eyes, but in a more subtle and natural way.

Want to know how I did it? Here are the steps!

Let's start!

Step 1: Double eyelid tape!!

Knowing your own eye shape is important. I was born with single eyelids and since I was young, all the adults would say it's a pity that I didn't get double eyelids when both my parents had them. Hahaha in Singapore during my parents' era got no sense of what is the politically correct thing to say one... In the States if you said monolids are ugly, people will say you are racist against Chinese and try to patronize you by saying that monolids are sexy and exotic. Or they scold you for not loving yourself. LOL

Well I'm Asian and so I'm allowed to say... I HATED MY MONOLIDS! Of course, this is not to make you feel bad about your monolids if you have them. Go ahead and feel that they are special and beautiful. But I like the whole dolly look and so I didn't like my monolids.

The reason is nothing racist. It's makeup woes.

When you have monolids your eyes tend to be hooded. Refer to the picture above for the monolid eye in the square. The flesh above the eye tends to droop down more, obstructing the iris and making eyes look smaller and more tired.

When you try to apply makeup, eyeliner goes under the eyelids, so you basically can't see any eyeliner or eyeshadow at all unless you put it super thick.

I was 13 when I first started putting on double eyelid tape.

In the past, it wasn't so convenient and I had to cut the tape myself. I even used scotchtape to cut costs. LOL!!


I put tape on everyday and one day, something miraculous happened...


When I took out the tape, the DOUBLE EYELIDS STAYED.

I developed permanent double eyelids! I don't know if it's from the regular application of the tape or because I just grew up that way... but it happened.


So why do I still need to use this if I already have double eyelids?

Because THERE ARE DIFFERENT TYPES OF DOUBLE EYELIDS!

There is tapered, where the inner corner of the eyelid joins with the eyes, which Koreans prefer.

There is parallel, where the inner corner of the double eyelid doesn't join with the eyes, which Japanese prefer. Parallel double eyelids are not very common naturally on Asians, but most Caucasians have it.


On the right is my natural double eyelid, which is quite low.

Even though it's technically not monolids, the double eyelids are so close to my eyelashes that any eye makeup I put will be obscured partially...

On the left you can see the effect after applying double eyelid tape! I chose tapered double eyelids for a more natural look, but it is still double the thickness of before.

You can see the difference in makeup later on. Double eyelid tape is a very important part of my makeup routine and I never go without it!


Here's how it looks like when my eyes are closed! Barely visible!

When applying double eyelid tape, remember to not go too close to the inner eye corner where it might cause you discomfort. Otherwise it's super comfy!


Makeup should be applied AFTER the tape is on, because powder on the eyelids will cause the tape to not stay. I tried Koji's eyelid tape and found it to be very long-lasting and comfortable!


Koji's new double eyelid tape is a very very light nude colour, translucent and looks almost visible on eyelids.


Next I'm applying eyeliner on both eyes, in deep black. They also have brown available for a softer look.

I love Dolly Wink's eyeliners!! Not only is the packaging so gorgeous, the liner itself is also very precise, easy to use, and it stays on all day. The control is good so it's easy for novices!


Done in a minute.


Here's the effect! Check out the difference between the two eyes!


You can see an obvious difference right? With tape, there are two visible lines, the eyeliner AND the double eyelid, giving it a more interesting look. Without tape, the eye looks smaller and eyeliner is partially covered.

Of course, you can decide which look you prefer, but I definitely think the higher double eyelids make the eyes look much bigger. Sad news for people with naturally high double eyelids though... There is no tape that can make it monolids even if you wanted to! LOL


Next step is Dolly Wink's famous eyelashes!

I am using Dolly Wink in No. 23. Sweet Girl. It is a very simple and natural pair of falsies that anyone can wear, even everyday!


First step to applying eyelashes:


Measure the eyelashes against your own eye length and cut accordingly. I didn't cut mine because I like my outer corner to have eyelashes jutting out a little. Makes eyes look longer!

The special thing about Dolly Wink's eyelashes is that the lash bone is very very soft, and transparent. When you have them on your eyelids they are fluttery and light... No discomfort and it feels like you are wearing absolutely nothing.

The eyelash designs are produced by the famous Japanese makeup icon Tsubasa Masuwaka herself. They have so many designs that one is bound to be your makeup staple.

I also used the new Dolly Wink's Eyelash Fix Glue to finish the job... The glue is super strong hold, waterproof, and water and perspiration-resistant!! And it also turns transparent after application so you won't see white glue patches on your eyes!


Next step: Mascara!


WHAT IS THIS?? HAVE YOU SEEN A FREAKING CHIOER MASCARA!???

Why so pretty!!

The Dolly Wink mascara now has a new packaging (I approve x 10000) and has an improved formula with a better lengthening effect!!

I'm using the "Long" mascara for longer lashes that fan out with the help of micro fibres for my lower lashes... gives an illusion of even bigger eyes!


FINISHED!!!!!!!

I also applied a bit of mascara to my falsies so they look like my natural eyelashes!


Here's the finished look!! Yay to big eye makeup!!

Do you want to try on big eye makeup but have NO IDEA how to do it? Or have you tried and it turned out to be a huge mess?


COME JOIN THE DOLLY WINK BIG EYE CHALLENGE EVENT!!


Join me at the event and you can learn the basics to expert steps of achieving big eyes! At the event, you will learn all about eye shapes, eyelids, eyelashes... You can identify your own eye shape and learn about the best ways to apply makeup to your own eyes.

On that day you will get:

- Free goodie bag of Dolly Wink and Koji products worth $65! SHIOK!!

- $10 voucher that's fully redeemable for any Koji products on the event day. Yay!

- You get to experiment with all Dolly Wink lashes, eyeshadows, eyeliners and all cosmetics to create big eyes! Very good lah don't need to buy and can try them all!

- BIG EYE Senseis will be around to teach you and help you! When they call it sensei it sounds like they got very ancient wisdom of eye make that nobody knows about haha

- WIN the big eye difference contest and YOU GET A PAIR OF AIR TICKETS TO TOKYO AND TOKYO DISNEYLAND/SEA!! If you have small eyes and you are confident you can make it look very big with makeup you definitely should come try!!

- I POST AGAIN BECAUSE  FREE PAIR OF AIR TICKETS TO TOKYO AND TOKYO DISNEYLAND/SEA IN CASE YOU NEVER READ PROPERLY

- You get to meet the most awesome blogger and learn tips from her. It's me in case you didn't get that.

- Free and unlimited instant photos!

- You will be the first to preview Dolly Wink limited edition new products and get a "buy 2 get 1 free" discount that day!

- Stand to win prizes!


SOUNDS LIKE AN AWESOME DAY!!!


You get freebies and best of all, learn to be chioer! It sounds fun!!!


Event details:

Date: 5th September

Venue: Scape Treetop 

Time: 
2pm to 4pm: For registered participants only
4pm to 6pm: Open to public!

Cost: $10 
(but you also get a $10 voucher redeemable, plus a goodie bag of products worth $65)


Sign up now at Dolly Wink's facebook page!


Read The Full Article